The second menu command, "Choose named condition lists of samples", lets you define or edit new named lists of hybridized samples. This is useful for defining sets of replicate samples. These may be further manipulated using the (Edit menu | Sets of Conditions (samples)) commands.
The third menu command, "Choose ordered lists of conditions", lets you
define or edit new named Ordered Condition Lists (OCL) of named
condition lists. This is useful for defining a sub-experiment
consisting of N conditions each with replicate samples. The last OCL
manipulated is defined as the "current OCL". The current OCL is used
in the OCL F-test Filter.
The fourth menu command, "Set Samples from lists", lets you change the
current HP-X and HP-Y, HP-Y samples as well as the HP-X 'set',
HP-Y 'set', and HP-E 'list' samples. This is similar to using the
"Choose HP-X, HP-Y and HP-E samples" command, but is more dificult to
use. You may change the current HP-X or HP-Y sample by clicking on
the sample name directly in the list of sample names on the left side
of the pseudoarray image (see Figure 2.2.3 legend).
The fifth menu entry, "Edit use (Cy5/Cy3) else (Cy3/Cy5) for each HP",
lets you swap data channels for Cy3/Cy5 data for individual samples.
Other menu commands list the status of the current HP-X 'set', HP-Y
'set', or HP-E 'list', and define condition class names that are
associated with the HP-X 'set' and HP-Y 'set'. The last menu entry,
"Use HP-X & HP-Y 'sets' else single samples", lets you switch
between using HP-X and HP-Y as single samples of sets of multiple
samples. For example, if you are using a scatter plot of X and Y, it
will switch the data being plotted from a comparison of single samples
to a comparison of means of sets of samples depending on the status of
the switch. Sets of samples are used extensively in data explorations.
Figure 2.2.1 Samples menu - selecting lists of samples by using the
"chooser". The hybridized samples assigned to the current HP-X,
current HP-Y, set of HP-X, set of HP-Y and expression profile list
HP-E may be changed from the Samples pull down menu using the
Choose HP-X, HP-Y and HP-E option lets you graphically change
the currently active sample HP-X, HP-Y sets and E-list.
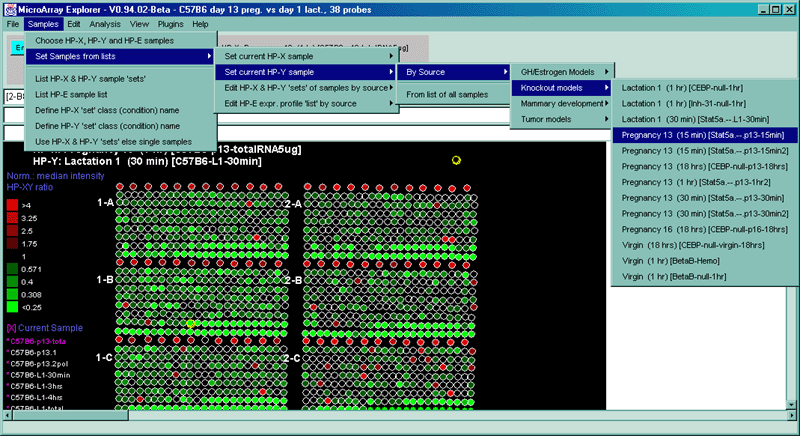
Figure 2.2.2 Samples menu - selecting samples by source
characteristics. The hybridized samples assigned to the current
HP-X, current HP-Y, set of HP-X, set of HP-Y and expression profile
list HP-E may be changed from the Samples pull down menu. The
specific "By Source" menus shown here are from the MGAP database.
This figure shows the user changing the current X sample from the
developmental stages submenu that is part of the "By Source" submenu.
Alternatively, samples containing a keyword or part of a keyword can
be found using a "guesser" popup window that allows the use of wild
cards. This is invoked using the "From list of all H.P.s" submenu. For
example, you could specify "*pregnancy*" to find all samples of
containing that word.
Figure 2.2.3 Changing the current sample to either the HP-X or
HP-Y sample by clicking on a sample name at the left edge in the
microarray pseudoarray image. The current sample is indicated in
magenta. Click on the magenta "*" adjacent to the new name you want to
select and it will change the HP-X sample. To switch between setting
HP-X and HP-Y, click on the [X] Current
Sample box to change the sample to HP-Y. You can click on
[Y] Current Sample box to change it
back to HP-X. Then clicking on a sample name will set it to the
current HP-X or HP-Y that was selected. This figure shows that the
user had selected [Y] and C57B6-L10-29hrs for the new HP-Y sample.
The Set current HP-X sample and Set current HP-Y sample
commands offer another way to set the single current X and Y sample
(see Figure 2.2.3 above for
the preferred way using the "Chooser").
The Edit HP-X & HP-Y 'sets' of samples by source menu allows
the user to define HP-X and HP-Y as sets having multiple
hybridized samples. Then, the mean values of the genes are used
when comparing HP-X with HP-Y.
For example, the By Source database-specific entries for the
MGAP database includes the following submenus.
The From list of all samples selection pops up a hybridized
sample guesser dialog window. As with the gene name guesser, you can
start typing in the name of a sample and it will give you a list of HPs
that match that initial string. You then click on the sample you want
and then press the Done button.
Figure 2.2.4 Samples menu - selectively swapping (Cy3,Cy5) data
channels for particular samples. This is only operative if your
database contains Cy3/Cy5 ratio labeling data. This is useful in
databases containing subsets of dye-swap experiments mixed in with
other samples that are not dye-swapped.
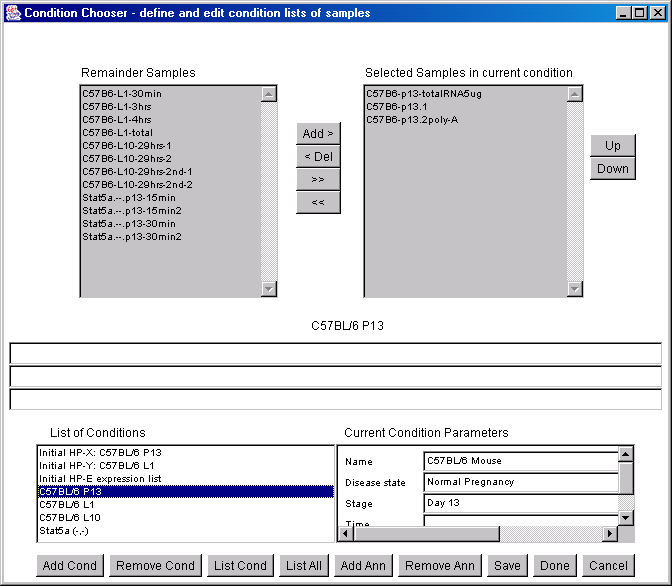
Figure 2.2.5 shows a screen illustrating a popup condition chooser
session. The set of all samples in the database is in the
scrollable "Remainder Samples" window in the upper left. The samples
you have selected for the condition list being edited is shown in the
upper right "Selected Samples in current condition" window. The list
of all conditions in the database is in the lower left "List of
Conditions" window. The current condition list that is selected is
highlighted and its contents displayed in the "Selected Samples"
window. User defined annotation associated with the current condition
are displayed in the right "Current Conditioned Annotation" window.
To add a new condition, click on the Add Cond button to define
the new condition name. The Remove Cond button is used to
delete a named condition list. The List Cond button pops up a
report listing the samples and annotation for the current
condition. The List All button pops up a report listing the the
names of all of the conditions and the annotation names. You may add
or remove new annotation names for all of the conditions. The Add
Ann button will add the new annotation you enter into all
conditions - you must enter the data for each condition that requires
it. You may The Save the current status of all of the
conditions into your working database. If you have pressed
Cancel before saving, then you will not have saved your
edits. Pressing the Done button will save the changes and
pop-down the window.
Figure 2.2.1 shows setting the HP-X, HP-Y, HP-E lists of samples using
the "Chooser" - the preferred method. Figure 2.2.2 shows setting the
HP-X sample from the menus. Figure 2.2.3 shows changing the current
HP-X sample by clicking on a sample name in the microarray image.
 -
define HP-X, HP-Y, HP-X 'set', HP-Y 'set', or HP-E 'list' from lists
of samples.
-
define HP-X, HP-Y, HP-X 'set', HP-Y 'set', or HP-E 'list' from lists
of samples.
![]() Use HP-X & HP-Y 'sets' else single samples [CB] - toggle
between using HP-X and HP-Y 'sets' of multiple samples or
single HP-X and HP-Y samples.
Use HP-X & HP-Y 'sets' else single samples [CB] - toggle
between using HP-X and HP-Y 'sets' of multiple samples or
single HP-X and HP-Y samples.

![Switching current X or Y sample by clicking on desired sample
in list at left edge of pseudoarray image. Switch between
X and Y by toggling '[X]' and '[Y]' of the Current Sample box.](GifsDocH/fig-HybProbeSetFromImageLarge.gif)
2.2.1 Selecting hybridized samples with Chooser or pull-down menu
sample lists
The Set Samples from lists submenu lets you define HP-X, HP-Y,
HP-X 'set', HP-Y 'set', or HP-E 'list' from lists of samples. It
contains four submenus:
- i.e. single HP-X sample from the list of H.P.s
- i.e. single HP-Y sample from the list of H.P.s
- edit sets of X and Y samples by
source for advanced statistics comparisons.
- edit samples by source in the HP-E
ordered list of samples for expression profile statistics.
The Edit HP-E expr. profile 'list' by source menu allows the user to
define an ordered list of samples for use in expression profile
statistics. Then, an expression vector of normalized quantification
values (one for each sample in the HP-E list) is computed for each
gene. Note: to place the samples in a particular order, start with an
empty HP-E set and then add them in the order you desire.
- add the selected sample to HP-X set.
- add the selected sample to HP-Y set.
- remove the selected sample from HP-X set.
- remove the selected sample from HP-Y set.
- add the selected H.P. to HP-E list.
- remove the selected sample from HP-E list.
The Convention for pull-down menu sample selection lists
We use a common sample selection scheme when selecting a sample from a
pull-down menu list. This sub-sample "By Source" option is only
available if your database was set up to allow sub-sample source names
in the Samples database.
- selects the sample from one of additional submenus. These
database-specific menu entries might be categories such as
developmental stage, tumor models, time series, etc and are
set up for a specific database in its configuration.
2.2.2 Swapping selected samples' (Cy3,Cy5) channels in ratio data
dye-swap experiments
The Edit use (Cy5/Cy3) else (Cy3/Cy5) for each HP command may
be used to selectively swap (Cy3,Cy5) data entries so the user may use
the samples (carefully, since gene labeling efficiency is not always
symmetric!) dye-swap data for replicates. This is only available for
ratio data. It swaps the data contained in MAExplorer (memory only) so
that the Cy3 data is swapped for the Cy5 data. For example, consider
the case where there are two materials A and B hybridized in two
experiments and labeled as follows: E1 (A=Cy3,B=Cy5) and E2
(A=Cy5,B=Cy3). Then, assuming uniform symmetric labeling (which is
generally not the case - although it might be true for a subset
of genes), then one might average data from E1 and E2 if the data from
E1 (or E2) were swapped. This is shown in the following figure.

2.2.3 Viewing sample HP-X, HP-Y, and HP-E partitions
You setup sets of HP samples for the HP-X and HP-Y sample sets and
HP-E expression list of samples using the Chooser (above). The current
contents of these lists may be viewed using the List HP-X &
HP-Y sample 'sets' to list the samples in the HP-X and HP-Y
'sets'. The List HP-E sample 'list' may be used to list the
samples in the ordered HP-E 'list'.
2.2.4 Defining sample condition 'class' names
When using sets of conditions, the HP-X and HP-Y 'sets', you will
probably want to assign meaningful names to these sets. The commands
Define HP-X class name and 2.2.5 Toggling between single HP-X (-Y) samples and HP-X (-Y) sets
When MAExplorer first starts up, it assumes that you wish to treat the
data as single samples so that HP-X and HP-Y are assigned to single
samples. However, if you want to work with sets of multiple samples
then you must toggle the state using the Use HP-X & HP-Y 'sets'
else single samples [CB] check box command. This toggles the state
between treating the data as multiple samples (HP-X and HP-Y 'sets')
or as single HP-X and HP-Y sample samples.2.2.6 Create and edit named condition lists of samples
The command Choose named condition lists of samples lets you
define new or edit existing named lists of hybridized samples called
"Condition lists". Associated with each condition list is a set of
annotation parameters to document the condition. The condition lists
may be used in the (Edit | Sets of conditions) operations. Among other
operations, you may assign any condition list to the working HP-X
'set', HP-Y 'set', or HP-E list of samples used through
MAExplorer. The last condition list that was edited with the (Sample
menu | Choose named
condition lists of samples) is called the "current condition" that
could be used in various operations. Figure 2.2.5 shows a screen
illustrating a popup condition chooser session where the legend
describes the options.
2.2.7 Create and edit named ordered condition lists (OCL) of conditions
The command Choose ordered condition lists of conditions lets
you define new or edit existing named ordered lists of conditions
called "Ordered Condition Lists" (OCL). Associated with each ordered
condition list is a set of annotation (name, value) pairs to document
the condition. The last condition list that was edited with the
(Sample menu | Choose
ordered lists of conditions) is called the "current OCL". The
current OCL is used by the (Filter menu | Filter by current
Ordered Condition List (OCL) F-Test [p-Value] slider [RB])
test. Figure 2.2.6 shows a screen illustrating a popup
ordered condition list chooser session.

